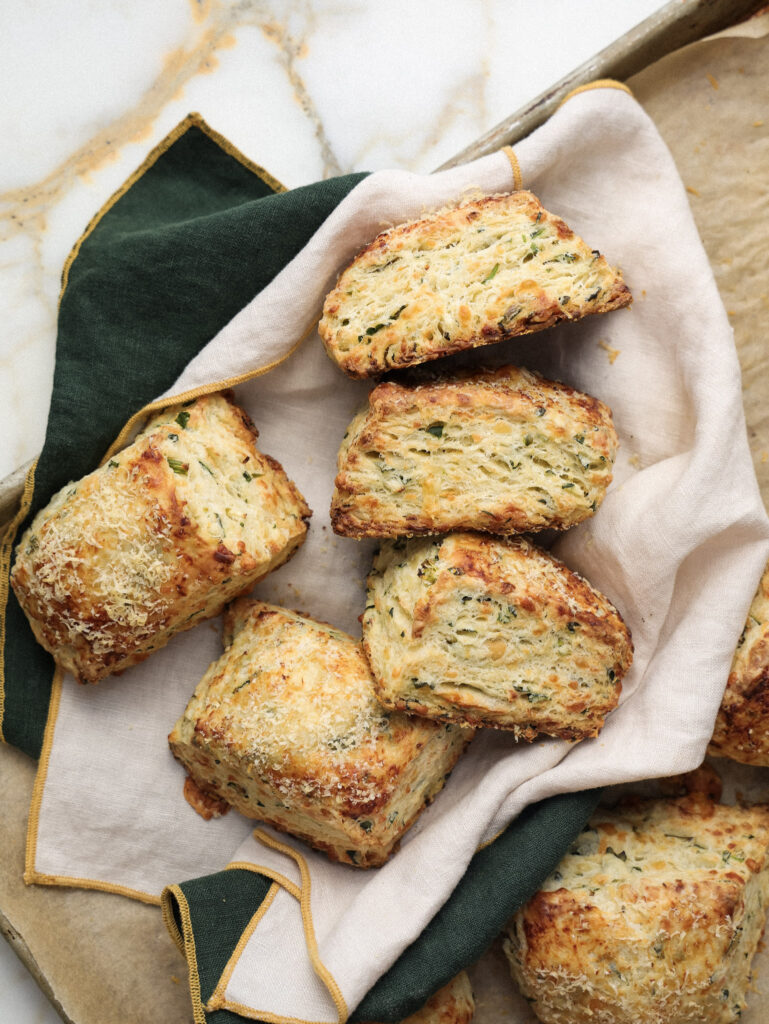
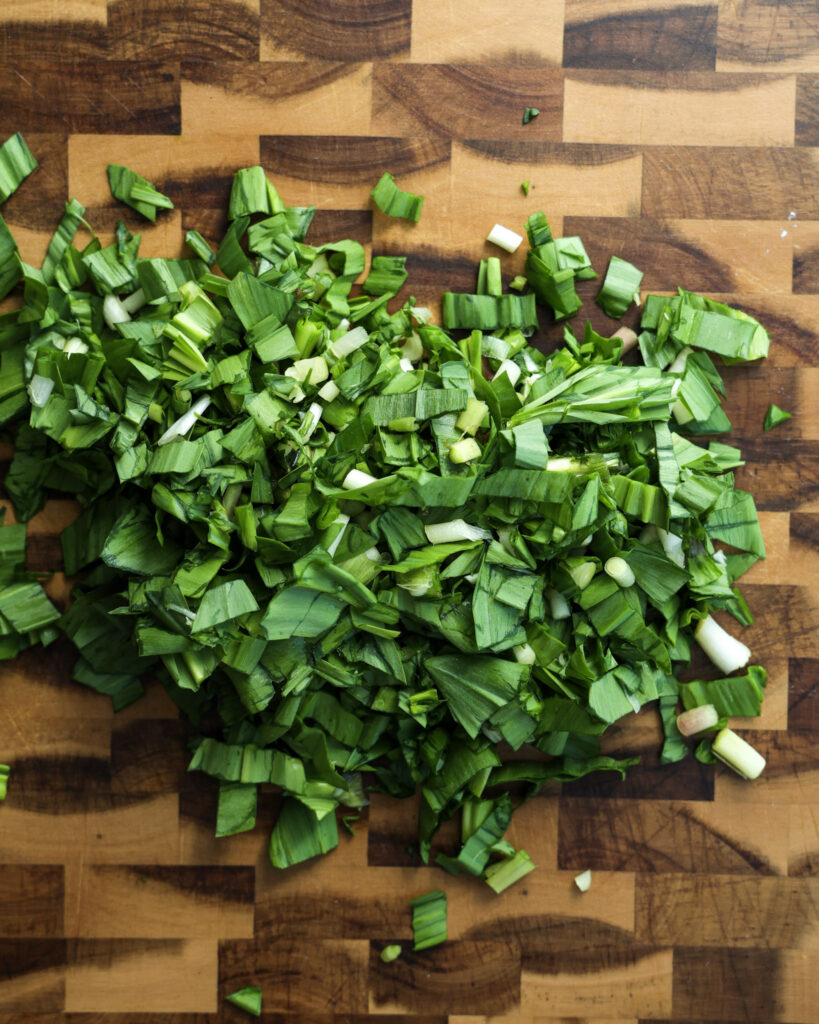
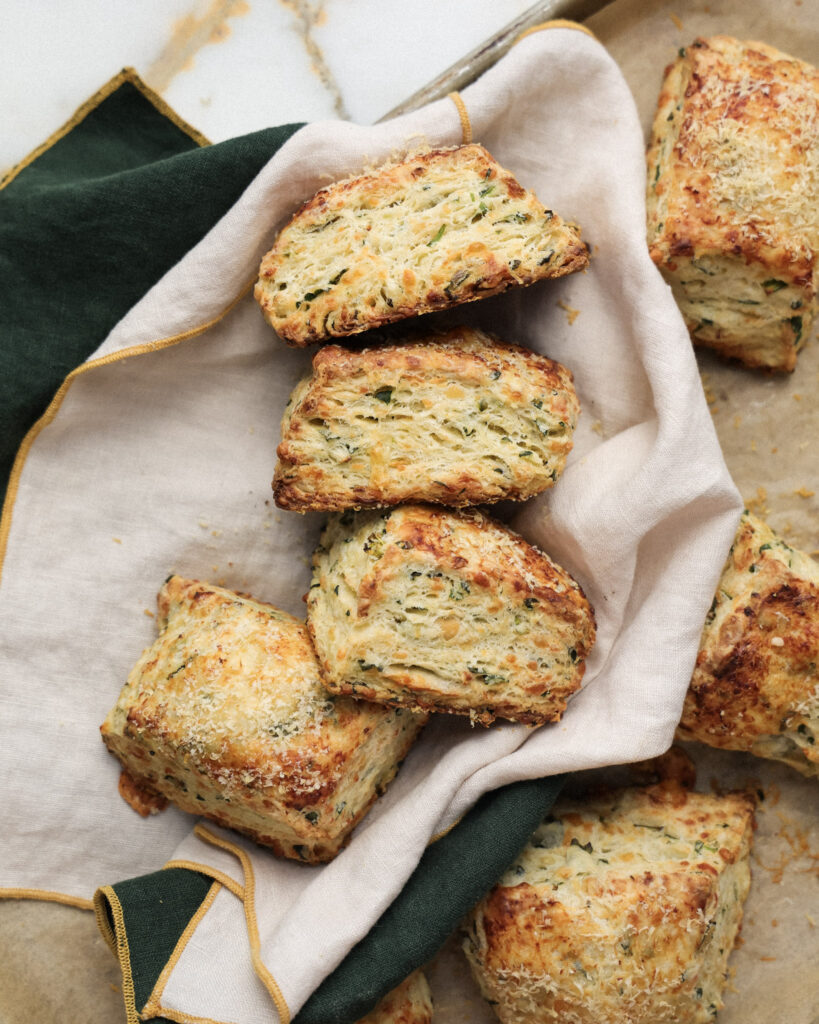
If there’s one thing I’ll never get tired of during spring, it’s folding ramps into basically anything and everything, especially these Three Cheese Ramp Biscuits. They’re everything I could want: flaky, buttery layers with little pockets of savory ramps tucked throughout, crisp edges, and just rich and tender enough thanks to a trio of cheeses that melt into the dough as they bake.
If ramps aren’t in the cards this time, don’t worry, this recipe is super flexible. Scallions make a great stand-in and bring the same fresh, savory bite. They are just a little more subtle than ramps but still really delicious folded into the dough.
These biscuits are best served warm from the oven, when the layers are at their flakiest and the cheese is still just a little melty. They’re great on their own or with a swipe of ramp butter if you’re feeling it (I always am).
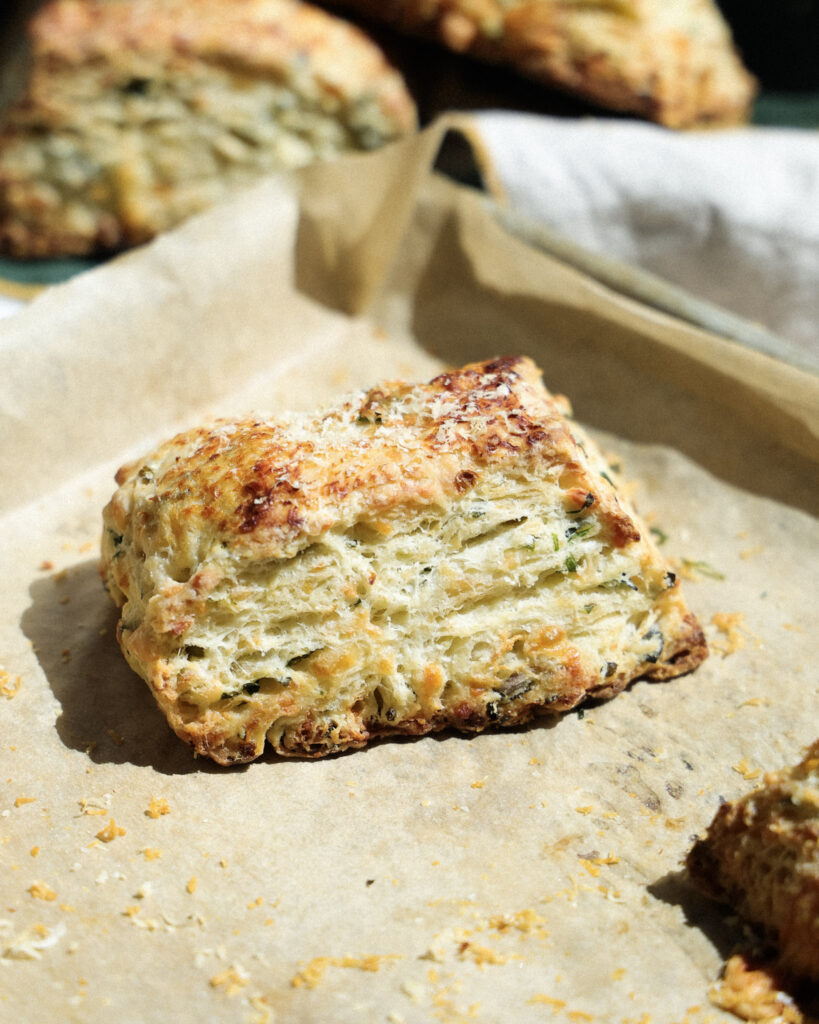
Table of contents
- What are ramps?
- Ingredients you’ll need for these ramp biscuits
- Ingredient substitutions
- Do I have to use ramps for these biscuits?
- How to make these ramp biscuits
- Tips for getting the flakiest layers
- Can you prep these biscuits ahead of time?
- Storage tips
- Why is this recipe in grams?
- Watch the recipe here
- Looking for similar recipes?
What are ramps?
In a nutshell, ramps are an allium and a native wildflower that pops up in the spring in North America. Their season is very brief, which is a big part of why they feel so special. They are also often referred to as wild leeks, spring onion, and ramson.
In cooking, they behave a lot like scallions but have a deeper, more complex bite, which makes them especially good for things like pestos, compound butters, or anything where you want a punch of allium flavor without overwhelming the dish. In this recipe, by folding them into the dough, they do exactly that and give you savory depth in every flaky layer.
I found this article to be the most scientific and insightful when talking about ramps, especially if you’re curious!
Ingredients you’ll need for these ramp biscuits
- 20 (3 oz) ramps, or scallions
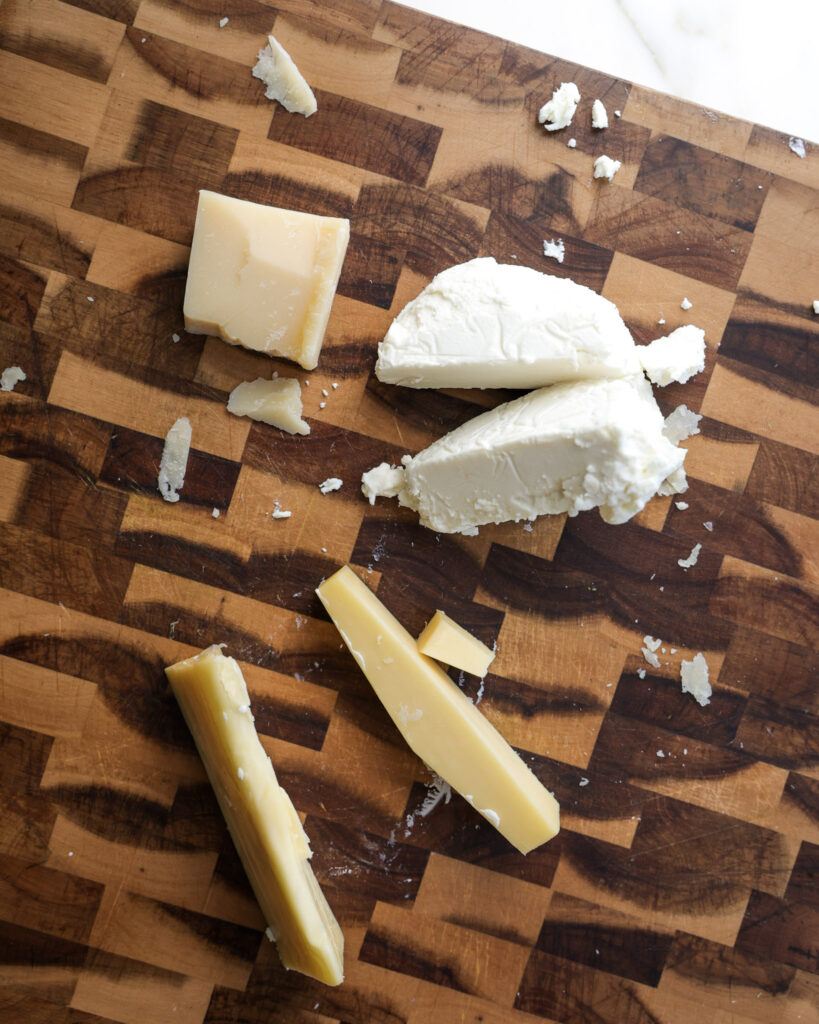
- 3/4 cup (85g) gouda
- 1/3 cup (28g) parmesan, plus more for topping
- 3/4 cup (113g) goat cheese
- 3/4 cup (170g) salted butter
- 3 cups (420g) all-purpose flour
- 1 tablespoon granulated sugar
- 1 tablespoon baking powder
- 2 teaspoons Diamond Crystal kosher salt
- 1 lemon, for zesting
- Freshly cracked black pepper
- 1 cup and 2 tablespoons (270g) whole buttermilk, plus more for brushing
Ingredient substitutions
This recipe is truly delicious as is but it is very flexible. Here are some substitution suggestions:
- Ramps: If you can’t get your hands on ramps but still want a similar vibe, they can be swapped for scallions or green onions.
- Gouda: Can be swapped for gruyère or a mild cheddar.
- Parmesan: Swap for pecorino romano.
- Goat Cheese: Unfortunately, not everyone is as big of a goat cheese fan as I am, so if you’re in that camp, it can be swapped for feta. You might just get a saltier, sharper flavor. You can also swap in for any other creamy cheese you like which has a less-tangy flavor.
- Butter: You can swap in salted vegan butter, just make sure it’s the stick kind, not the tub, as those tend to have more water and may not give you the same flaky texture.
- All-purpose flour: Can be swapped for King Arthur’s 1:1 Gluten-Free Baking Flour, if needed.
Do I have to use ramps for these biscuits?
The short answer: no.
If you’d like to save your ramp greens for another recipe (trust me, I get it), or if you can’t get your hands on any, you can absolutely use scallions instead.
Ramps and scallions are basically cousins, so they both bring that same oniony, lightly garlicky vibe to the table. Scallions are just a bit chiller, less punchy, so your biscuits will still taste amazing, they’ll just be slightly more subtle in flavor.
How to make these ramp biscuits
- Roughly chop the ramps into small pieces and set them aside.
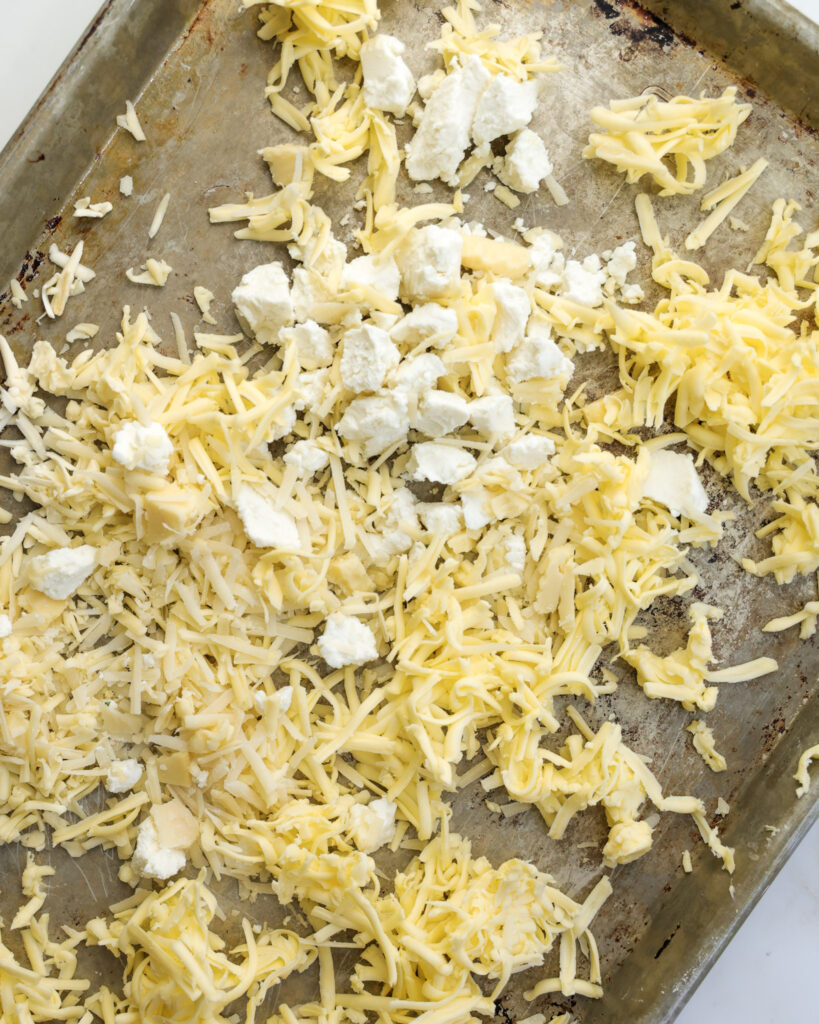
- Use the large side of a box grater, grate the gouda and parmesan onto a half sheet pan. Crumble on the goat cheese. Grate the butter onto the sheet pan as well. Pop this in the freezer while you prep the rest of the recipe.
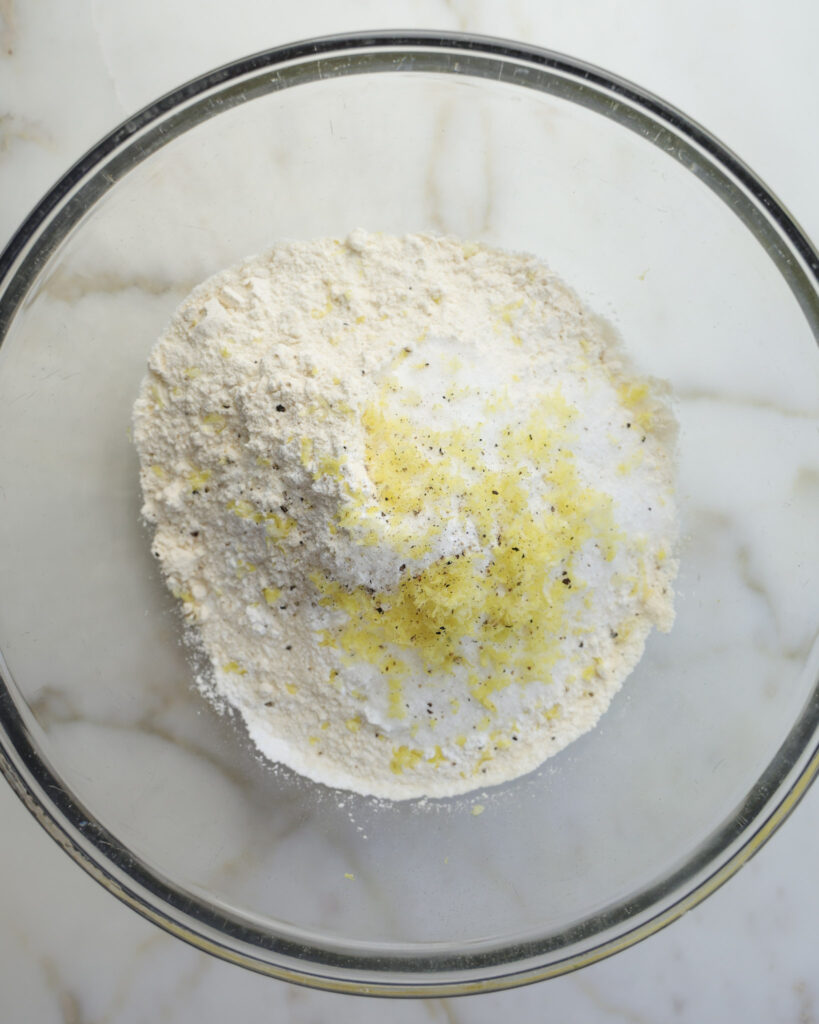
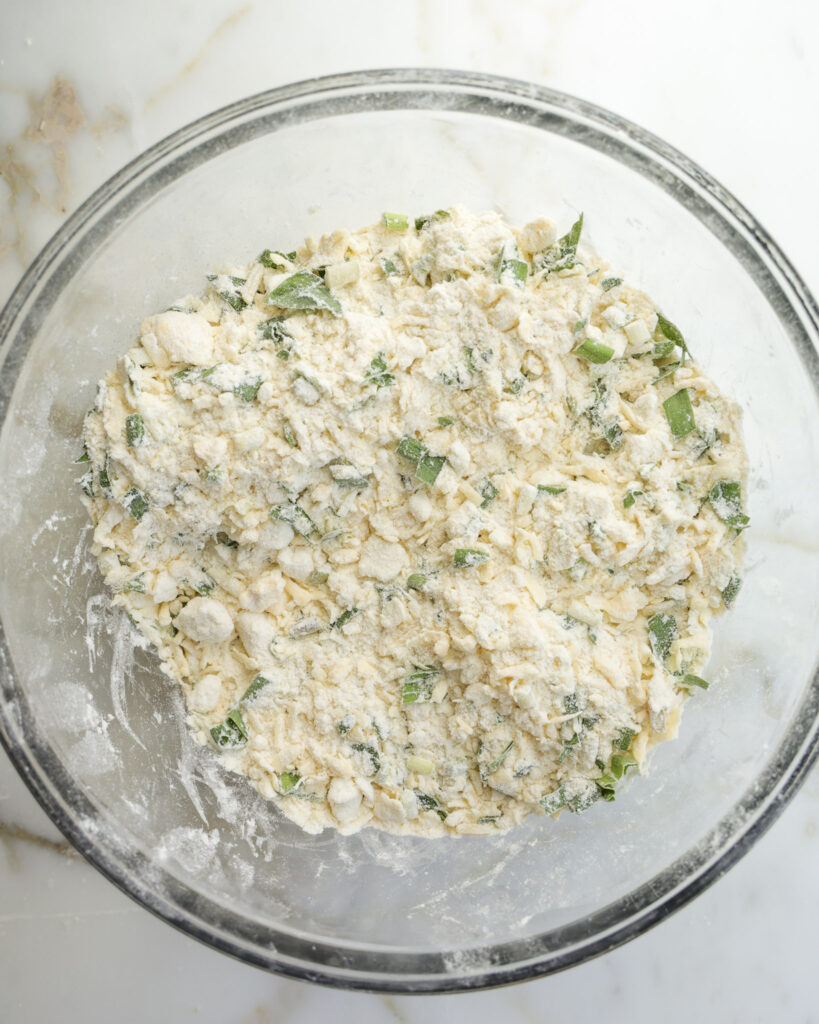
- In a large bowl, whisk together the flour, sugar, baking powder, salt and lemon zest. Crack in some freshly cracked black pepper and mix. Add the chopped ramps and mix again, it will start to smell fantastic.
- Add the chilled butter and cheese into the flour. Mix, pressing with your fingers, until all the butter and cheeses are covered in flour. Press any large pieces into discs and mix until the mixture is crumbly but still cool.
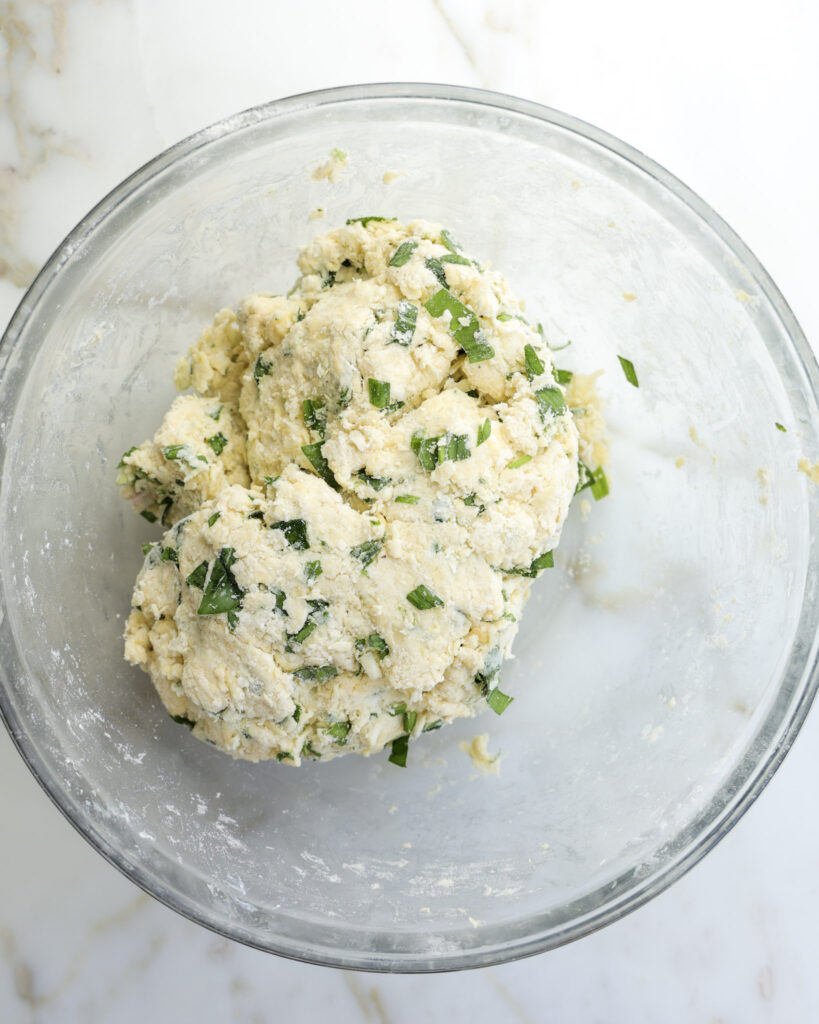
- Pour in the buttermilk and mix first with a spatula, then switch to your hands to press it into a shaggy dough. It will feel a little dry, which is totally fine.
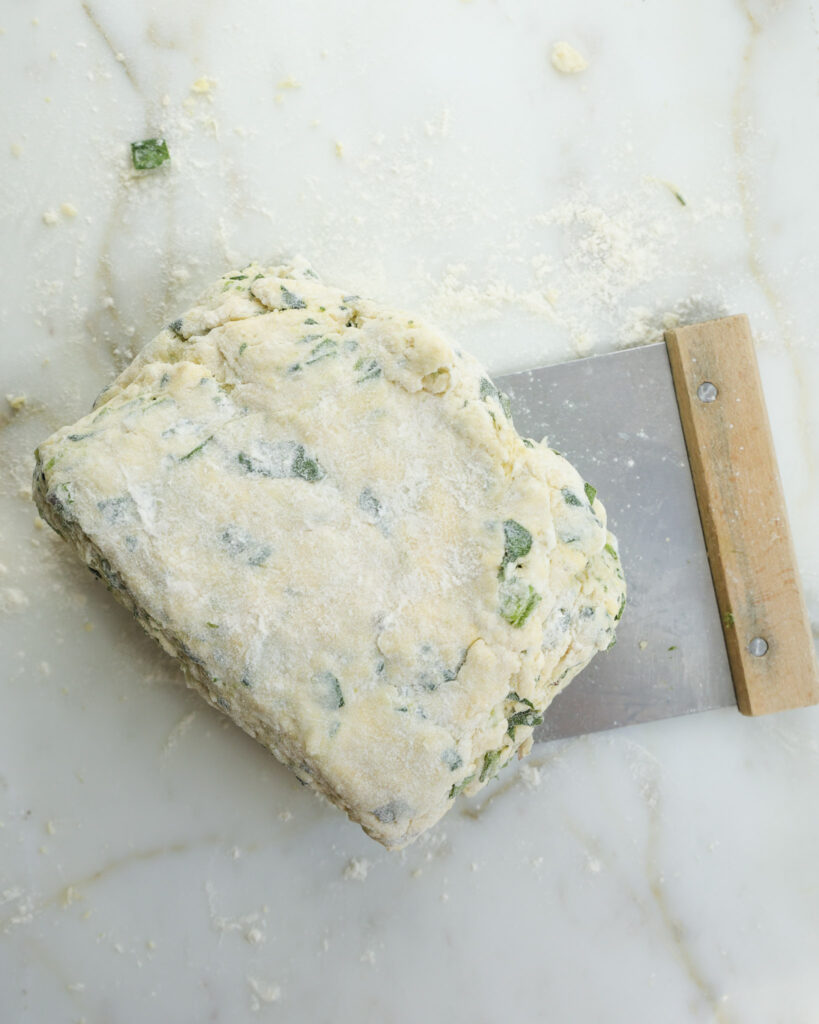
- Move this to a lightly floured surface and press the dough together into a circle. Cut the dough in half with a bench scraper, put one piece of dough on top of the other and press, making a bunch of layers. Rotate 90° and repeat the process. Do this up to 5 times, but at least 4. Work quickly so the dough remains cool, and dust with flour to seal up any butter “pockets” that might pop out. Press the dough down until it is around 2 inches tall and the shape of a rectangle.
- Wrap the dough in cling wrap. Use a rolling pin to gently roll it out into a tight rectangle that is 2 inches tall. Place this in the fridge for at least 30 minutes.
- Preheat the oven to 375°F convection.
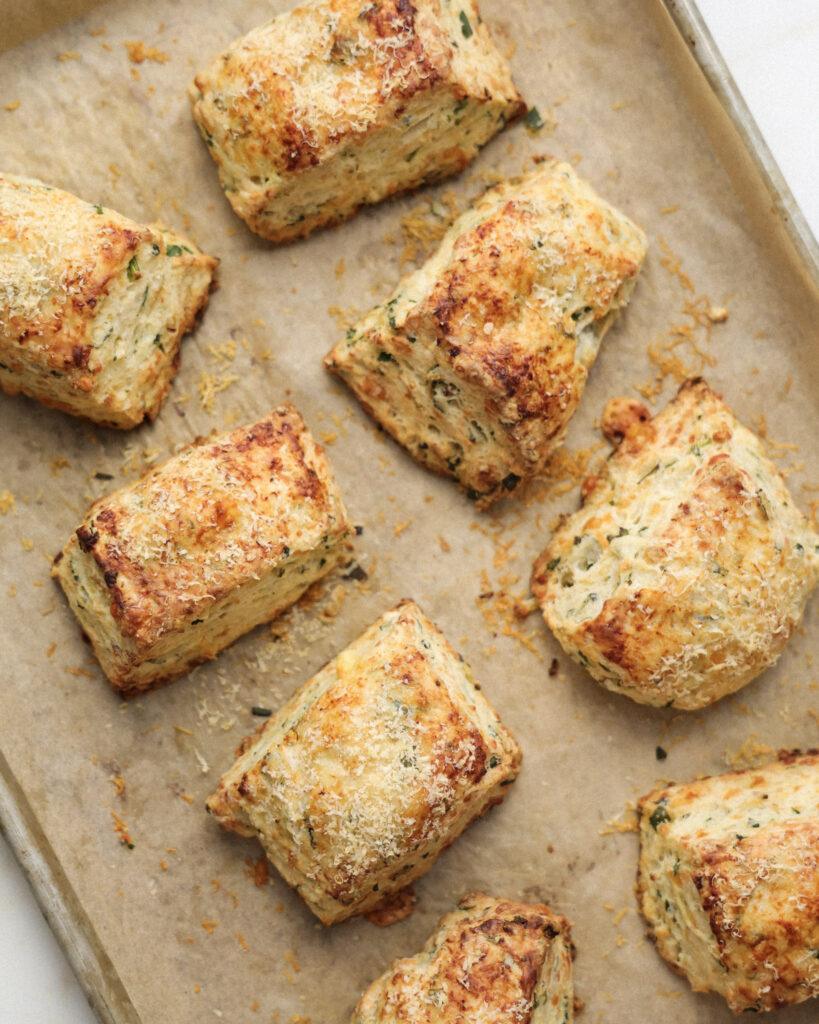
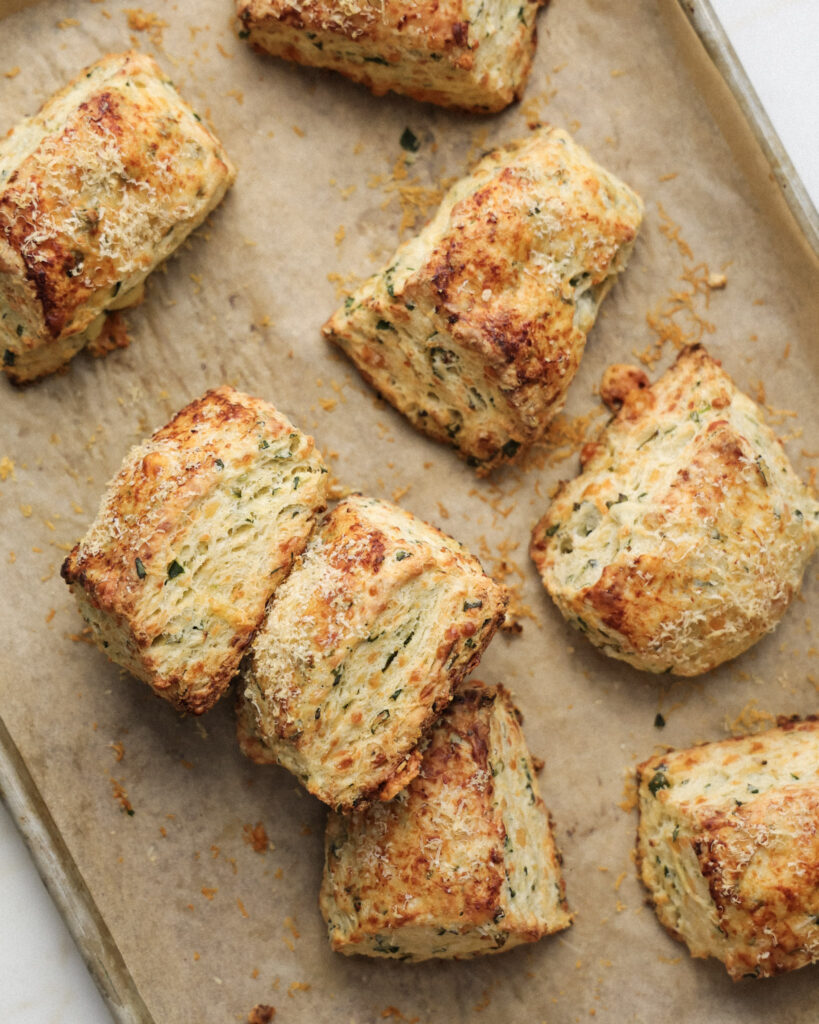
- When it’s time to bake, cut the dough into 8 pieces (I cut mine in a row of 4×2), and place them on a parchment-lined baking sheet.
- Brush with buttermilk, then grate a bit of parmesan over every biscuit. Bake for 30-35 minutes or until deeply golden brown.
Tips for getting the flakiest layers
Getting flaky (but not at all dry) biscuits is all about the dough, so here are my top tips to help you get them just right every single time:
- Chilling: Using cold ingredients helps hydrate the flour and keeps the butter and cheese from melting too soon, which means fluffier biscuits that hold their shape in the oven. I like to chill everything (your butter, cheese, and buttermilk), so those cold pockets stay intact, especially since butter and cheese melt at different rates, and you want both working in your favor for maximum layers.
- Use flour: as needed to help tuck the butter back into the dough. This is another technique that helps prevent the butter from melting too early.
- Layer, layer, layer! Cutting the dough in half, layering it on top of itself and pressing down repeatedly will create more and more layers. I recommend doing this at least 4 times, but 5 is best.
- Work quickly: Once you start mixing and shaping, try to work quickly so the butter and cheese stay cold. The less time everything spends at room temperature, the more distinct your layers will be!
Can you prep these biscuits ahead of time?
Absolutely! Mix your biscuit dough and then store it tightly wrapped in cling wrap in the fridge for up to 3-4 days. When you’re ready to bake, follow the rest of the recipe as written. Just make sure the biscuits are fully sealed, otherwise you risk the dough drying out.

Storage tips
This makes eight biscuits, and hopefully they will all disappear quickly. But if you have some left over, here is how I recommend storing them:
Room temperature: Store them in an airtight container at room temperature for 1-2 days. I think these are best enjoyed warm, so you reheat in a toaster oven or oven at 350°F for 5 minutes.
Fridge: If you want them to last a bit longer, store them in the fridge for up to 4-5 days. Just reheat in the oven or toaster before serving to revive that crispy top.
Freezer: Once baked and cooled, freeze the biscuits in a single layer on a baking sheet, or layered in a ziploc bag. I like to layer each with parchment paper, which makes retrieving a single biscuit very easy. To reheat, bake straight from frozen at 350°F for about 12-15 minutes, or microwave for 1-2 minutes.
Why is this recipe in grams?
Grams is always my preference for baking, and I hope it will be yours, too. The only way to ensure complete accuracy is through measuring by weight, not volume. One cup of flour can weigh all the way from 120 grams to 160 grams, depending on how it was packed. This ends up causing some volatility and miss-matched results.
I want to ensure you get the best results with this recipe (and I want to keep this recipe foolproof!) so I highly recommend getting a small affordable kitchen scale if you want to move forward with this particular recipe.
Watch the recipe here
The video may not fully represent the recipe. For best results, follow the instructions as written.
Looking for similar recipes?
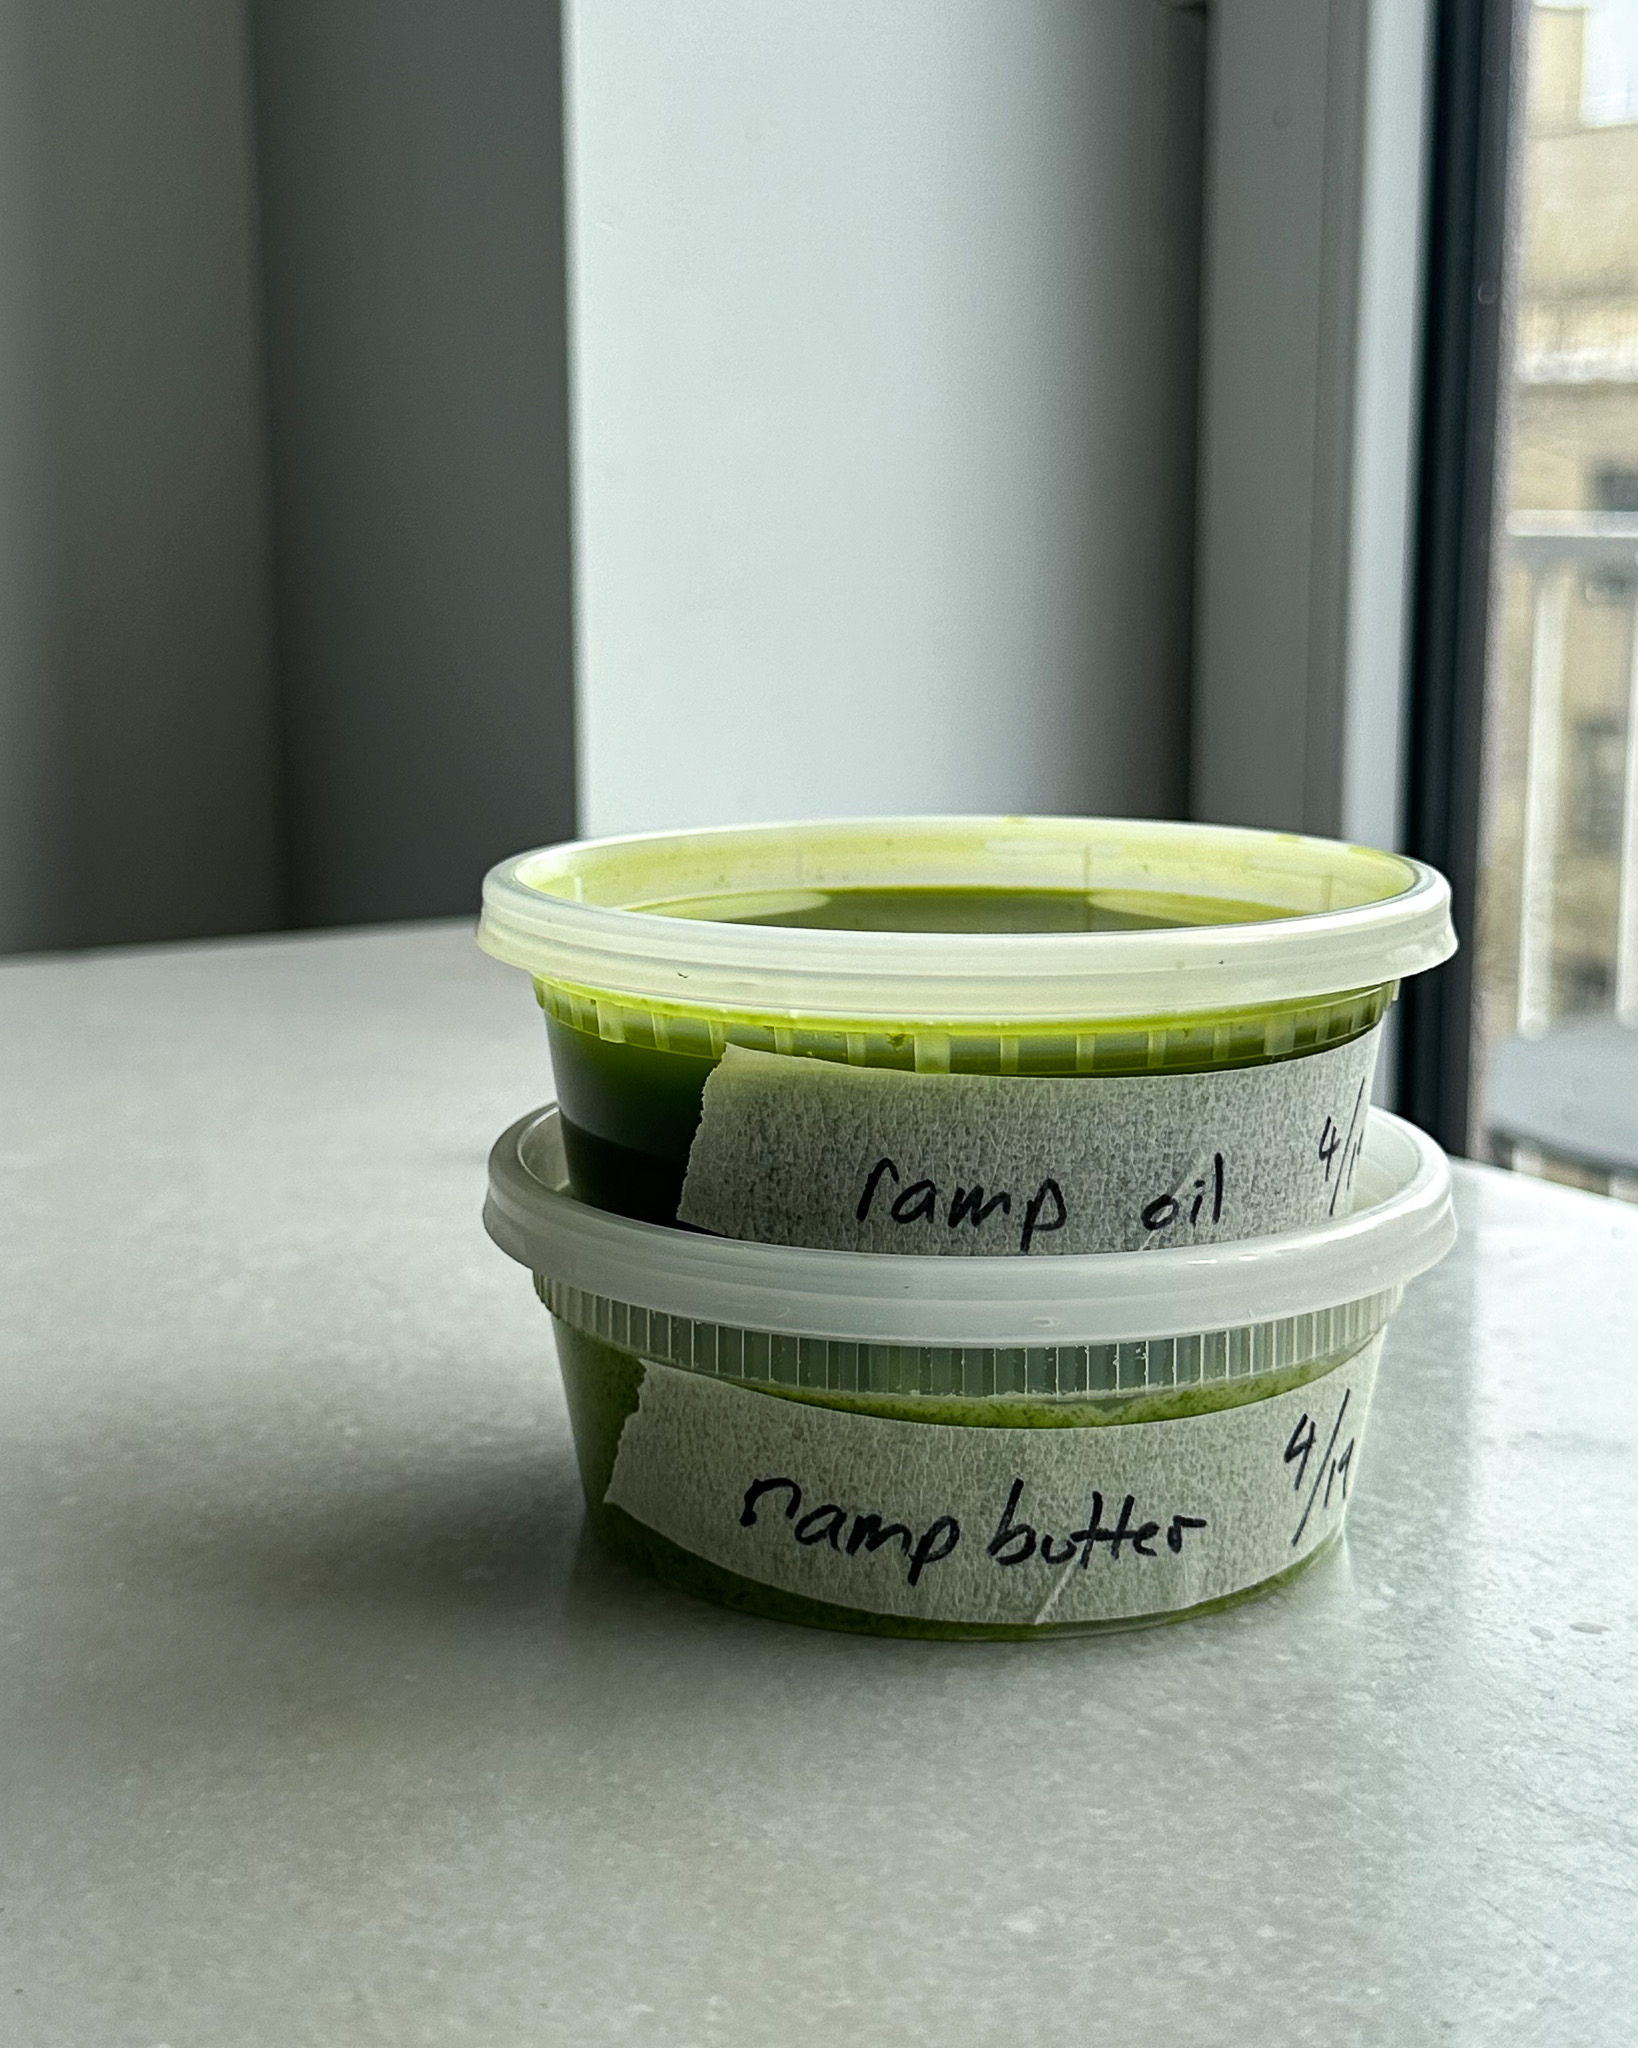
How to Make Ramp Oil & Ramp Butter
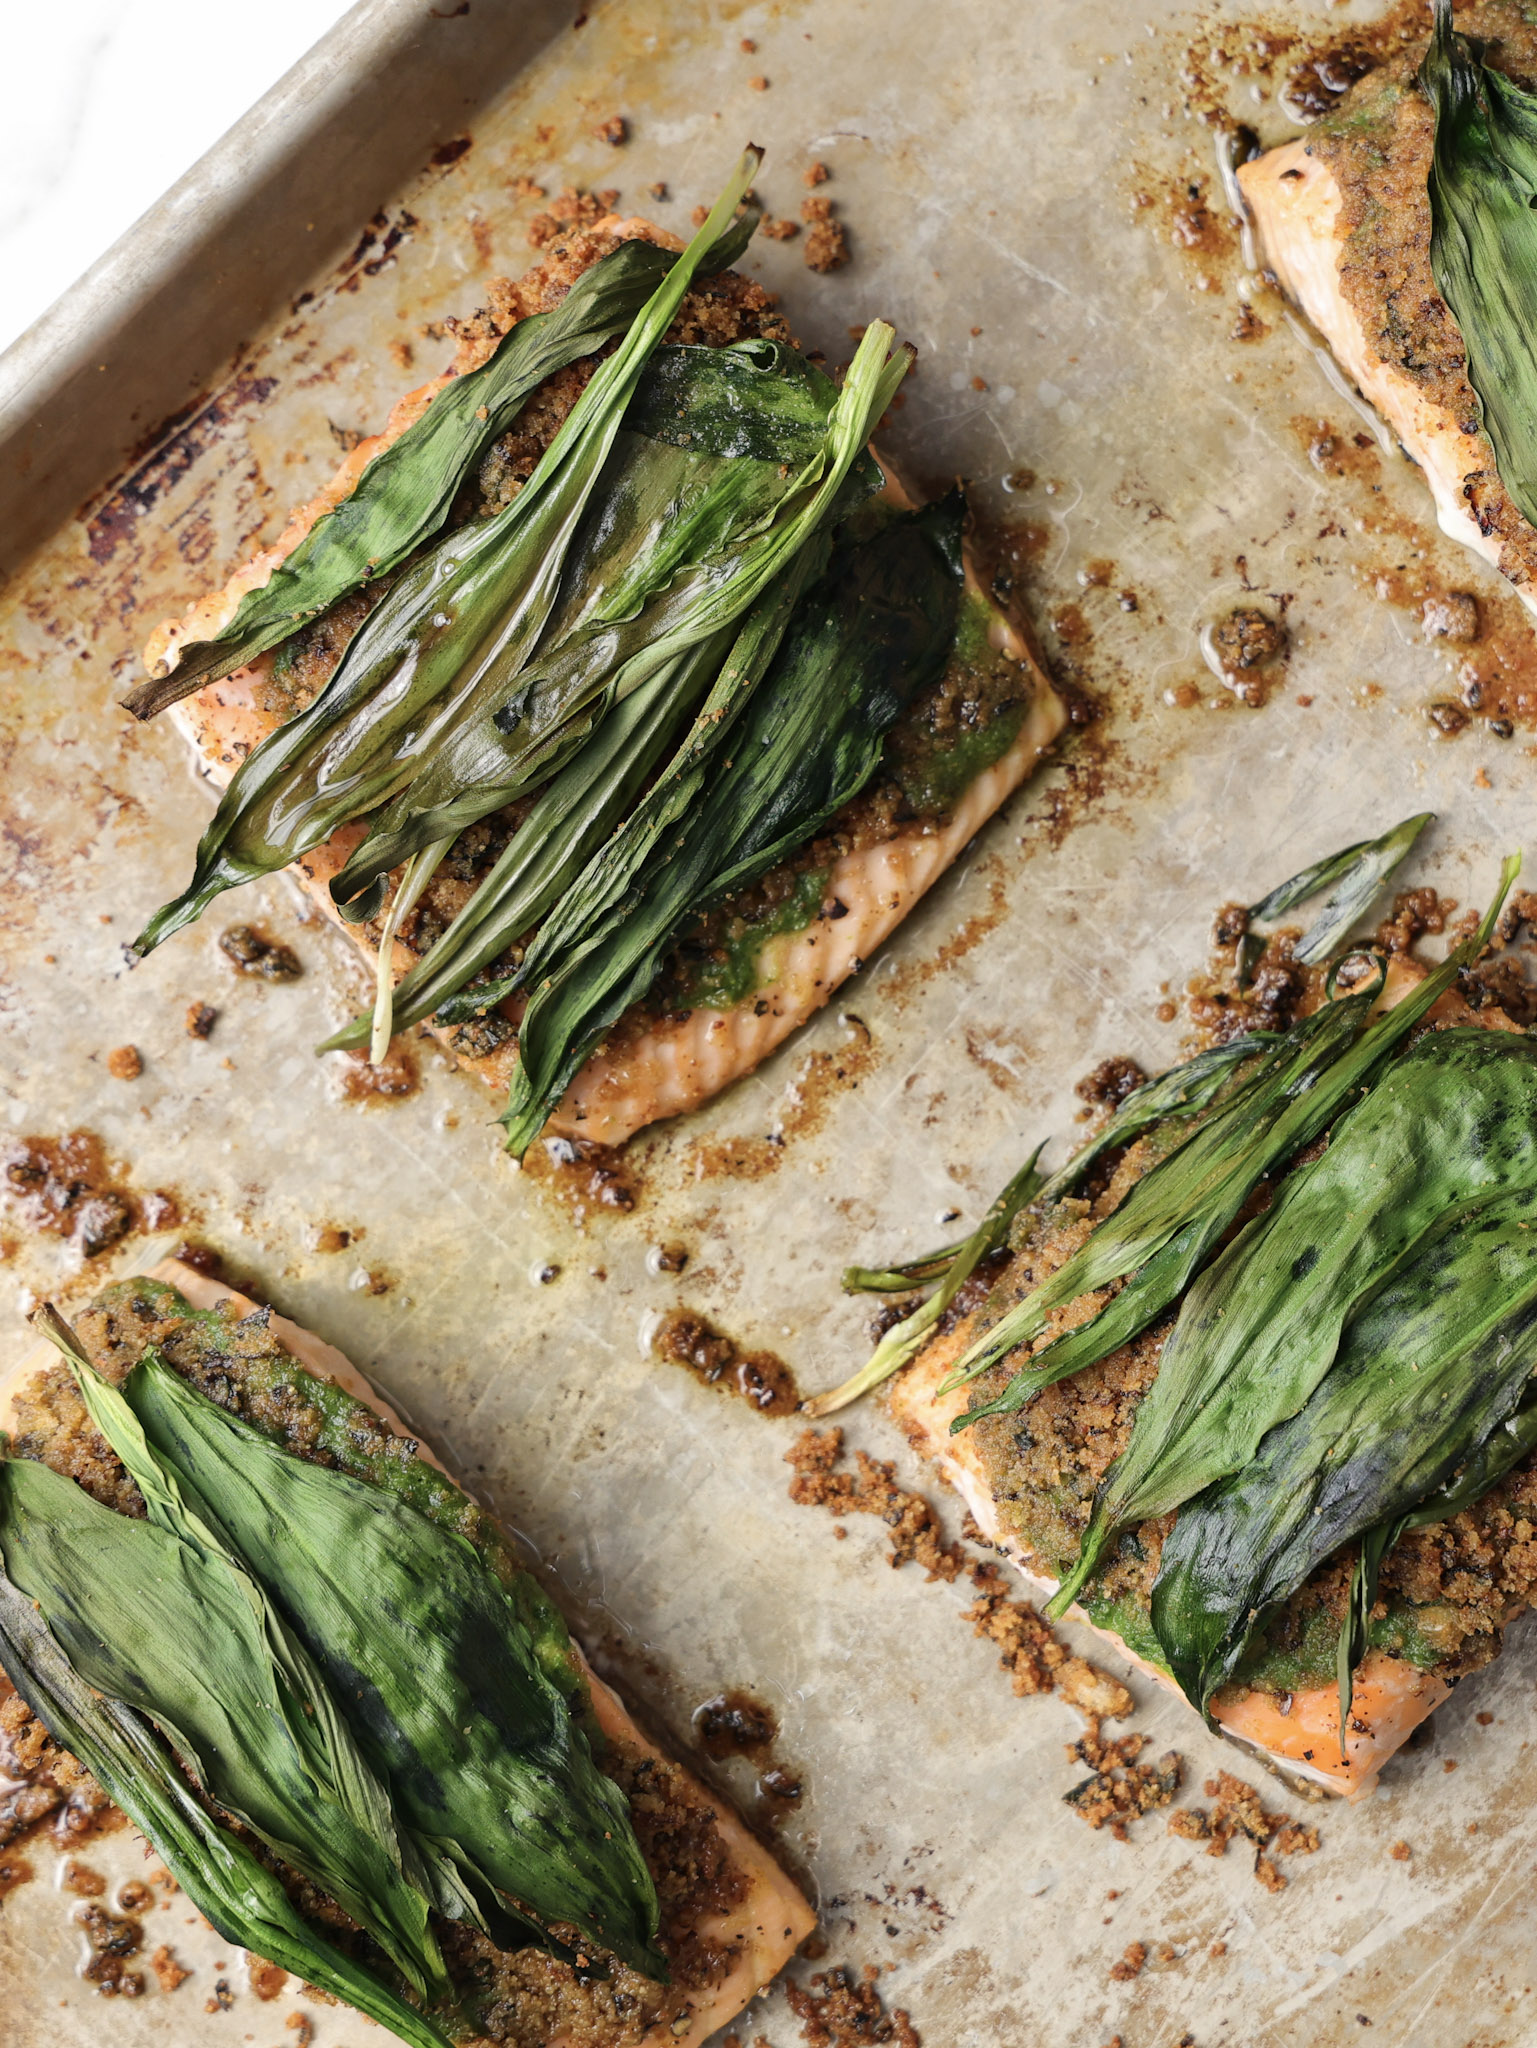
Ramp Covered Salmon
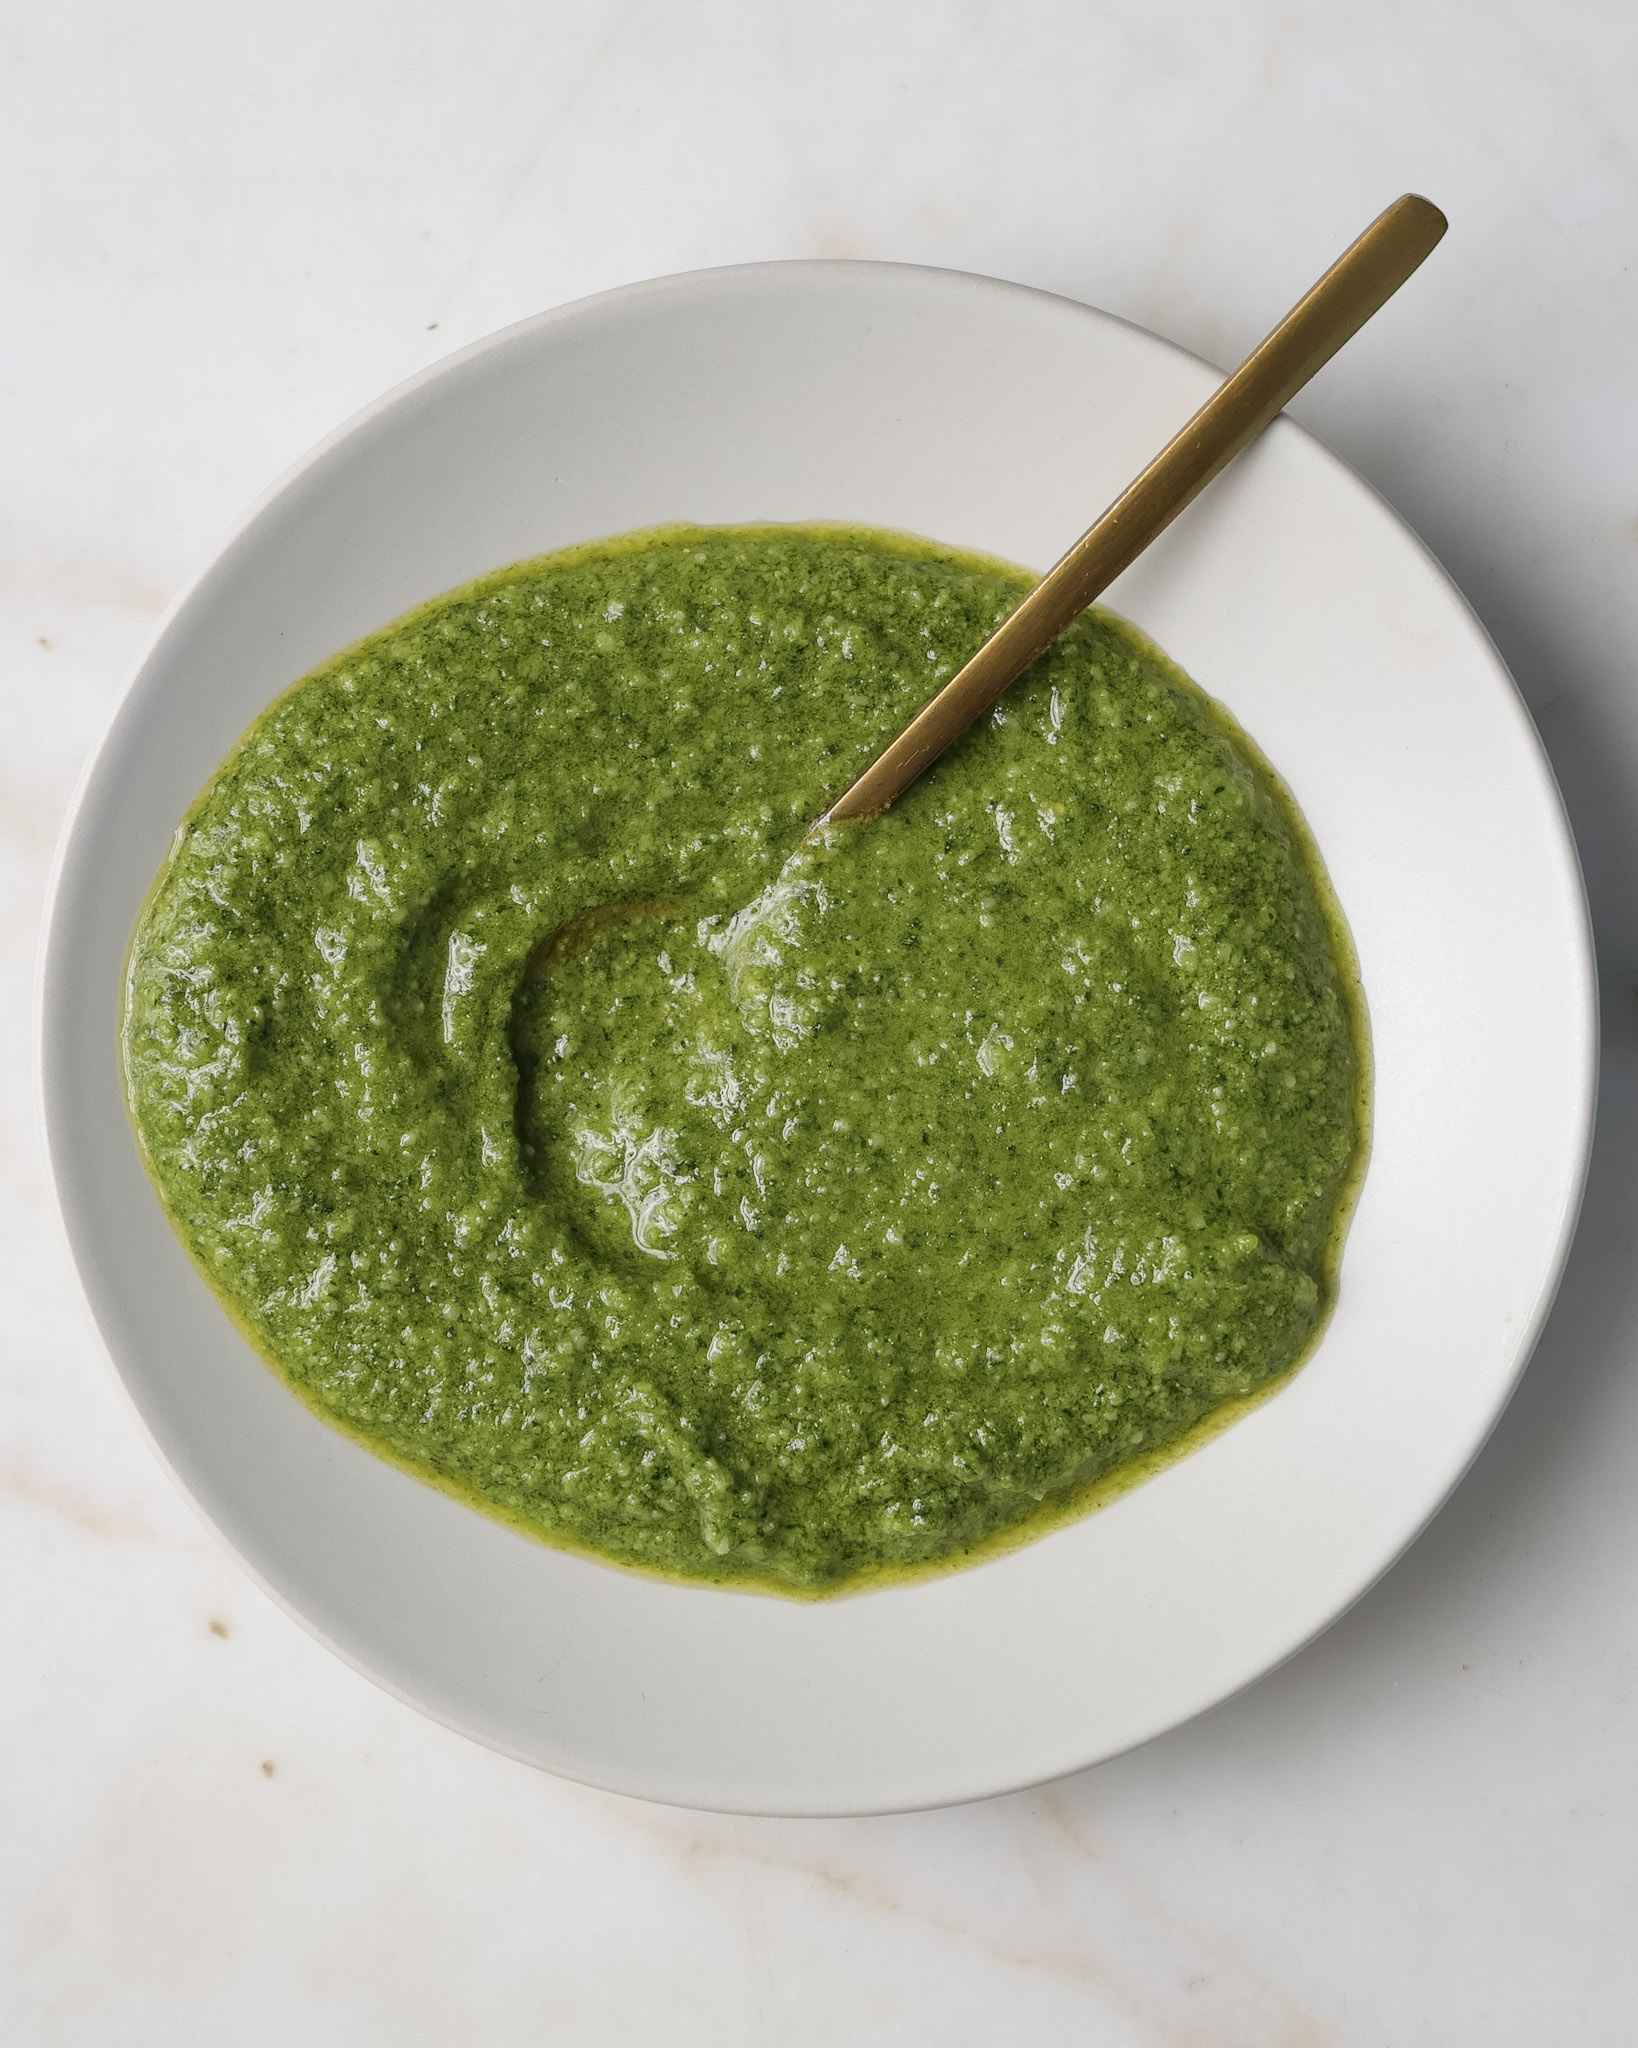
Ramp Pesto
And that’s everything for these Three Cheese Ramp Biscuits!
If you make it, please tag me on Pinterest or Instagram so I can see! It’s my favorite thing to scroll through stories and see what you all are making.
You can also shop this video if you’re looking for the exact pieces I use – I’ve linked everything on my ShopMy! *some links may contain affiliate commissions
And of course feel free to leave any questions, comments or reviews! This is the best place to reach me, and I’d love to hear from you <3

Equipment
- 1 large bowl
- 1 whisk
- 1 rolling pin
Ingredients
- 20 (3 oz) ramps, or scallions
- 3/4 cup (85g) gouda
- 1/3 cup (28g) parmesan, plus more for topping
- 3/4 cup (113g) goat cheese
- 3/4 cup (170g) salted butter
- 3 cups (420g) all-purpose flour
- 1 tablespoon granulated sugar
- 1 tablespoon baking powder
- 2 teaspoons Diamond Crystal kosher salt
- 1 lemon, for zesting
- Freshly cracked black pepper
- 1 cup and 2 tablespoons (270g) whole buttermilk, plus more for brushing
Instructions
- Roughly chop 20 ramps into small pieces and set them aside.
- Use the large side of a box grater, grate 85 grams of gouda and 28 grams of parmesan onto a half sheet pan. Crumble on 113 grams of goat cheese. Grate 170 grams of butter onto the sheet pan as well. Pop this in the freezer while you prep the rest of the recipe.
- In a large bowl, whisk together 420 grams of flour, 1 tablespoon of sugar, 1 tablespoon of baking powder, 2 teaspoons of salt and the zest from 1 lemon. Crack in some freshly cracked black pepper and mix. Add the chopped ramps and mix again, it will start to smell fantastic.
- Add the chilled butter and cheese into the flour. Mix, pressing with your fingers, until all the butter and cheeses are covered in flour. Press any large pieces into discs and mix until the mixture is crumbly but still cool.
- Pour in 270 grams of buttermilk and mix first with a spatula, then switch to your hands to press it into a shaggy dough. It will feel a little dry, which is totally fine.
- Move this to a lightly floured surface and press the dough together into a circle. Cut the dough in half with a bench scraper, put one piece of dough on top of the other and press, making a bunch of layers. Rotate 90° and repeat the process. Do this up to 5 times, but at least 4. Work quickly so the dough remains cool, and dust with flour to seal up any butter “pockets” that might pop out. Press the dough down until it is around 2 inches tall and the shape of a rectangle.
- Wrap the dough in cling wrap. Use a rolling pin to gently roll it out into a tight rectangle that is 2 inches tall. Place this in the fridge for at least 30 minutes.
- Preheat the oven to 375°F convection.
- When it’s time to bake, cut the dough into 8 pieces (I cut mine in a row of 4×2), and place them on a parchment-lined baking sheet.
- Brush with buttermilk, then grate a bit of parmesan over every biscuit. Bake for 30-35 minutes, or until deeply golden brown. Serve warm!
Comments
Aren’t these scones??
I live in America 🙂 We typically use the word interchangeably here, with scones tending to have more chunky fillings (such as fruit) and be cut in a triangular shape! So biscuits felt the most fitting for accuracy and SEO!
FYI these are NOT vegetarian if you use most Parmesan cheese (and even the Gouda) which contain rennet, made from calf stomach.
Hi again, Robb! We didn’t advertise this as vegetarian, but you can use any cheese sub you like to make it so!
I riffed on these a bit to make them vegan but used your method and they turned out divine. My new favourite recipe!
I’m so glad vegan substitutes worked well and that you loved them! Thank you for taking the time to leave a review.
hello! as a 13.5-year vegetarian, I would like to add comment that the original comment is misleading, you can absolutely buy parm that uses microbial or vegetal rennet, so there is vegetarian parm out there (it is also kosher, as in the kosher diet you cannot eat the animal and animal product together). I just wanted to mention this! whole foods has a veg parm, but many other places do too. I have not made this yet but am excited to!
Such a delicious recipe! My bf ate half of them in one day and said they were my best work !! I will say I happened to pick up one bunch of ramps at the farmers market, which measured out to 1oz. I proceeded with the recipe for the rest, and mine still packed a flavorful rampy punch! youre the best Justine!!
I’m so glad you both loved them and that it worked well with less ramps! Thank you so much for taking the time to leave a review <3
Can I use pregrated parm?? Or does it have to be grated on the large side of the box grater
Preferably grated by hand, pre-grated tends to have anti-caking agents that may impact the dough!
Hi!!! These biscuits are AMAZING (I love ramp season!)!! The layers came out perfect and the flavour is out of this world. I was wondering if you could freeze the dough and then bake when fresh or would that ruin the texture/layers? Thank you for another delicious recipe 🙂
I’m so glad you love them and love ramp season as much as me!! You can absolutely freeze the dough and then bake.
These were great. Thank you for creating a fun way to use the seasonal ramp. I liked the subtle lemon notes and over all deliciousness. I didn’t have enough ramps for the recipe but I squeaked by and added some onion and garlic powder to my flour mixture. I also substituted about a third of the all-purpose flour with whole wheat and pastry flour which I like to do when I bake. Highly recommend!
I’m so thrilled you loved them! Great to know that whole wheat flour and pastry flour worked well. Thank you so much for taking the time to leave a review <3
I made these with a 50:50 mix of spring onions and pickled jalapenos, and substituted about 100ml of the buttermilk for jalapeno pickle liquid, and they are amazing! The instructions you’ve given are really thorough and clear, which made me more confident of my substitutions – thank you.
I’m so glad you loved them and those swaps worked – the addition of jalapenos sounds so good. Thank you so much for taking the time to leave a review!
Hi! What’s the best step to freeze these at? Also, how to prep after frozen to bake/reheat? I’m trying to plan/prep for my baby shower and would love to have these! Thank you!
Hey Lauren! First, congratulations 🙂 I hope my reply isn’t too late. For freezing, I’d only freeze the dough if you are prepping it more than 2 days in advance, otherwise the dough will be fine in the fridge. For the freezer, cut the biscuits into their proper sized pieces, then freeze them. Bake them from frozen and add 5-6 minutes onto the baking time. If you are putting them in the fridge, I’d leave it as a rectangle wrapped firmly in cling wrap, then slice them right before baking. This just holds a bit more moisture in which helps with the tenderness. I hope this helps!
These biscuits have now become my #1. They were so good and so easy to make, everyone that ate one raved about them!!!
This is the NICEST comment, and I’m so thrilled! This recipe is one of my favorites so I’m glad it’s now yours, too.
Excellent! My husband took one bite and said,”this is one of the best things you’ve ever made.” I agree! Thanks for another incredible recipe, Justine!
Major win! I’m so thrilled you both loved them 🙂
These were fantastic! I forgot to buy Gouda but had Trader Joe’s unexpected cheddar in my fridge, so subbed that equally for the Gouda. Turned out delicious! Such a great recipe. Easy to follow and the end product is fabulous. Thanks Justine!
I’m so glad you loved them and the cheddar sub worked!! Thank you for taking the time to leave a review 🙂
What a perfectly delicious recipe! I modified it by substituting scallions for ramp, using mozzarella, fontina, and parmesan, and added garlic and onion powders. They came out SO delicious! I’ve never been successful at getting the LAYERS in my biscuits but Justine is right — the grated frozen butter and cheese makes all the difference. This will be my go-to biscuit recipe from now on! ❤️
I’m so thrilled you loved them and that these changes worked perfectly. Thank you so much for taking the time to leave a review <3
I made these with vegan butter and cheese and they turned out absolutely divine. Will only ever make scones/biscuits in this way – so so good!
I’m so glad you loved them and the vegan substitutes worked! Thank you for taking the time to leave a review 🙂
Such an amazing recipe!!
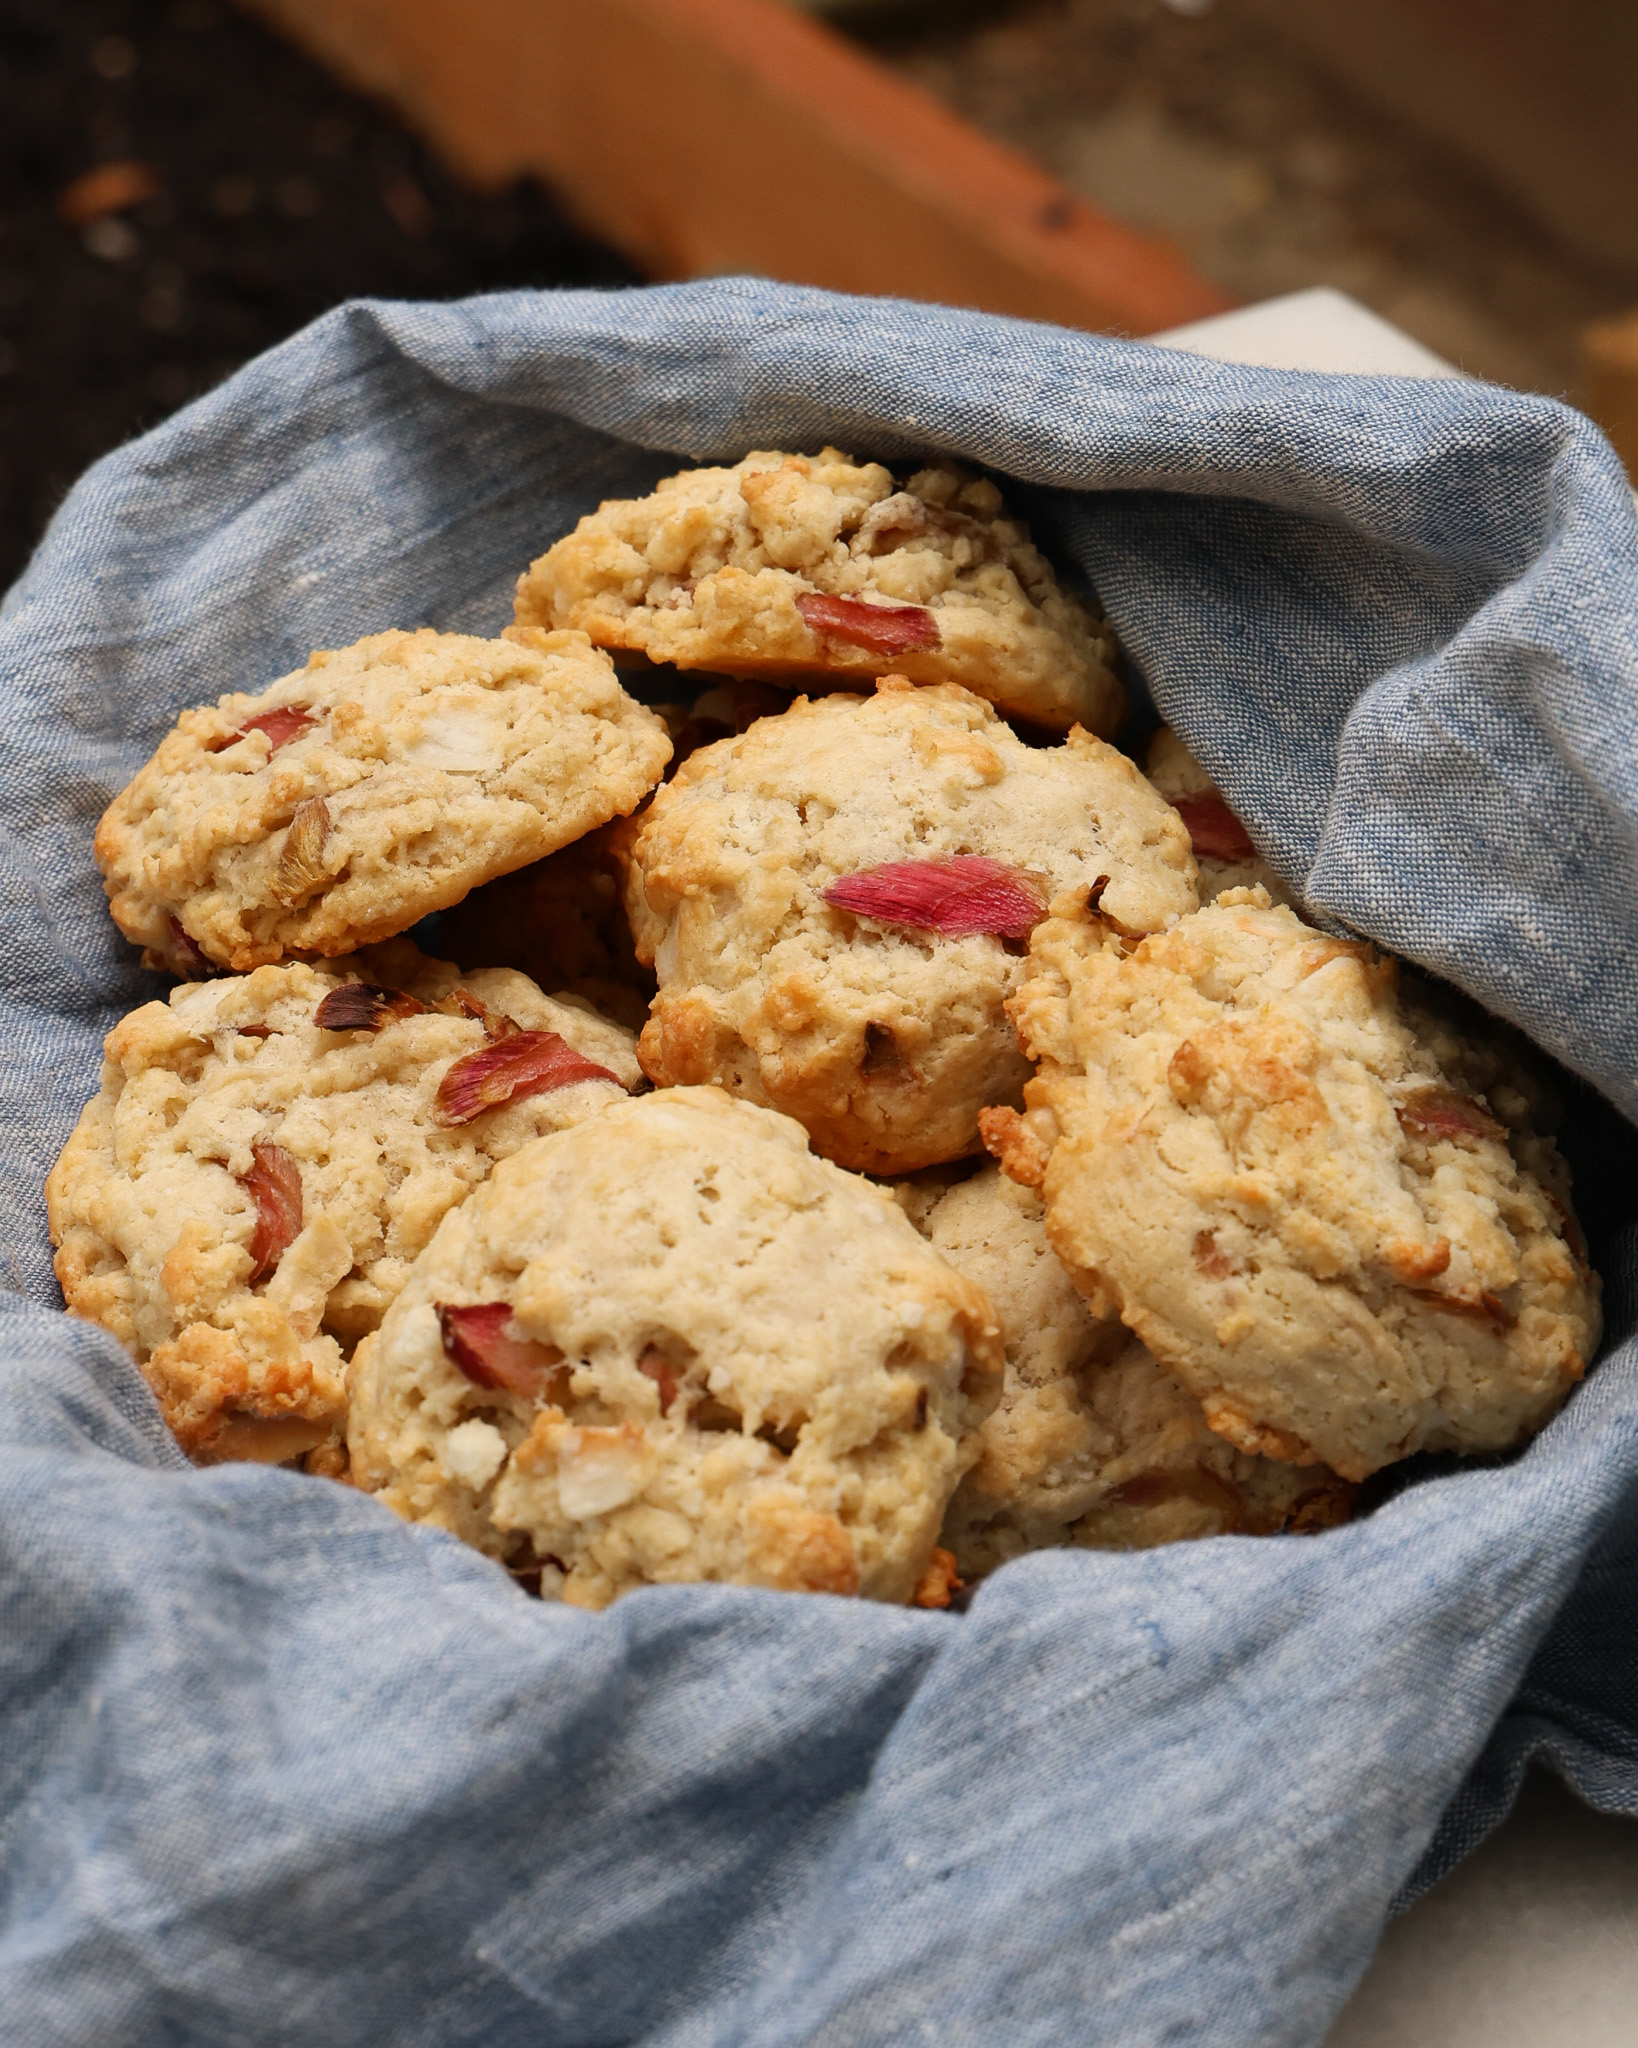
I had to make these after making the strawberry and raspberry scones (Also an absolute must make) they were so delicious.
I made it with spring onions since I couldn’t find ramps in the market and they turned out absolutely delicious!!
I ate them as snack and for breakfast with eggs. My partner was also obsessed. Thank you for the recipe!
I’m so glad you and your partner loved them and that the spring onions worked well!
I truly loved making these biscuits! My home never smelled this good before (and I bake often…) and the taste was just soooo wonderful!!! Best savoury biscuits ever!
This is music to my ears!! I’m so glad you loved them 🙂
Love these! I did not have ramps but needed to use up some garlic scapes and they worked wonderfully in this recipe in place of ramps. Love the goat cheese in the biscuits, too!
My husband said they’re the best biscuits I’ve ever made and will definitely be making them again!
I’m so thrilled you both loved them and that the garlic scapes worked well! Thank you so much for taking the time to leave a review 🙂
I made these tonight, and they were amazing! I subbed cream cheese for goat cheese, but followed everything else exactly. I’m a true Southern girl, so my biscuit standards are high! I appreciated the grating of the cheese and butter and the emphasis on cold ingredients in this recipe. Not only that, but I was impressed by the directions and tone of the recipe. THANK YOU for including the weights in the ingredients in the instructions and not just in the list of ingredients! That made such a difference when I had the recipe pulled up on my phone and my hands were coated in flour. I will definitely come back to this delicious recipe, and I look forward to exploring more on this site.
OMG I’m so glad you loved the biscuits and found the blog post super helpful! Thank you for taking the time to write such a kind review <3
I am never giving reviews online BUT THESE WERE PHENOMENAL 😍😍😍🤤🤤🤤 i used one type of cheese only and oh my god, I did not know I could make such things!! They are fantastic, so rich and flavorful, absolutely perfect and divine 👏🏻👏🏻👏🏻
I’m so thrilled you loved them! Which cheese did you use? Thank you so much for taking the time to leave such a king review <3
I live in Switzerland and I used Appenzeller hard, strong cheese 🙂
Leave a Comment
Made this recipe? Tell me all your thoughts or if you’ve got any questions!